Upgrading from 12v to 5v Motor - Retrofit Guide
What are the steps to upgrade a shade from a 12v motor to a 5v motor?
This guide covers the conversion process for replacing legacy 12v roller shade motors with 5v models.
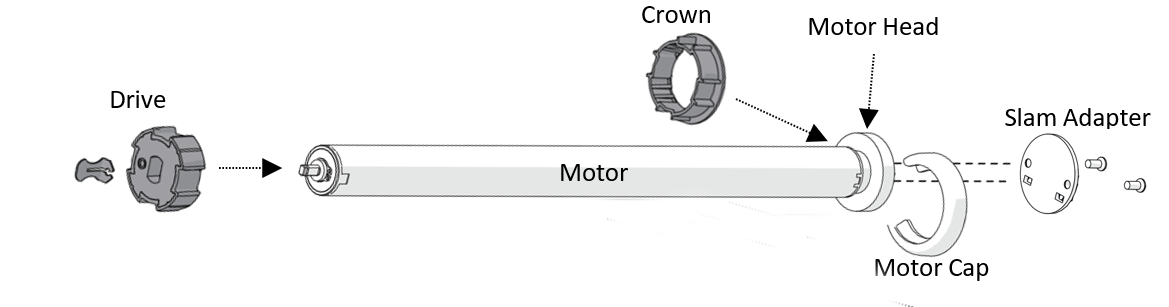
1. Remove the existing 12V motor from the aluminum tube.
2. Remove the crown, drive, and motor cap from 12v motor.
3. Hold the P1 button on the 12v motor for approximately 14 seconds until the motor jogs 4 times, then release to reset it to factory settings.

For more info, see How to Factory Reset a Motor.
4. Inspect the shade hardware to determine the bracketing system. Refer to the images below to identify different bracket systems and the needed parts.
Bracket Styles
R-SERIES | SKYLINE | LOUVOLITE | COULISSE |
5v Motor Head Adapter Plates
R-SERIES R8 PN: MT03-0205-069001 | R-SERIES R16 PN: MT03-0205-069002 | SKYLINE PN: MT03-0206-069002 | LOUVOLITE PN: MT03-0207-069015 | COULISSE PN: MT03-0207-069007 |
Motor Crown and Drive Kits
25mm - 1.25in 25mm - 1.5in 28mm - 1.5in
PN: MTCRDR-25-1.25 PN: MTCRDR-25.1.5 PN: MTCRDR-28.1.5
5. Ensure the new 5v motor is fully charged.
6. Extract crown & drive set from 12V Motor and reinstall onto 5V motor.
7. Install proper motorhead adapter on 5V motor to match the correct system in place. Refer to image above for the different motorhead adapters.
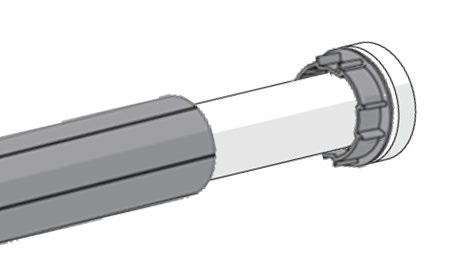
8. Insert 5V motor into the aluminum tube by aligning keyways in the crown & drive wheel to the tube. See the image above for reference.
9. Mount motorized tube onto brackets.
10. You may experience a slight difference in the light gap due to the narrower motorhead of the 5V (~3.7mm). To account for the difference in the light gap, the pin end can slide out from the tube 1/8". You may also try the following:
a. Switch from the Regular pin end to the Heavy Duty pin end (SLPEV653XX > SLPEHD53XX)
b. One (or both) of the brackets can also be rotated 180 degrees and reinstalled. The brackets can also be bent slightly inward (unless it's a cassette system).
c. Rollease Acmeda will offer an adapter to allow for use of the existing 12V motorhead adapter to be used with the 5V motor. Please check with inside sales for availability. *In some cases, you may have to use the short version of the motor and keep the Regular pin end.
5V Zero Li-ion EQ 1.1 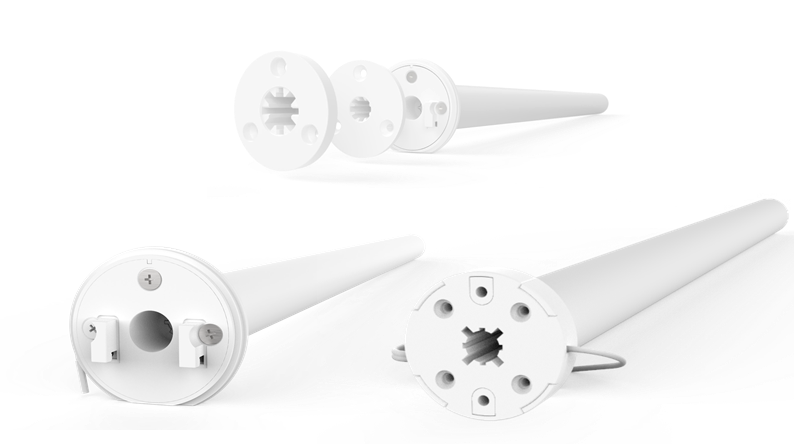 12V Wirefree Li-ion 1.1
PN: MT01-1325-069002 PN: MTDCBRF25-1.1
11. Please note the following differences between 12V and 5V motors
a. 5V motors utilize an internal Micro USB charging port. This will require a new charging cable (https://tinyurl.com/34srdb3u).
b. 5V motors are preset to 20RPMs while 12V motors are preset to 28RPMs or 40RPMs. Please see the following URLs to adjust speeds to match (http://www.youtube.com/watch?v=RZsDIU8jlFw).
c. 5V motors have a new Soft Stop feature. This can be disabled to match existing 12V motors (http://www.youtube.com/watch?v=fZNqGo1AS7c).
d. These steps will allow for the motors to operate as similarly as possible. Please be advised there may be a slight difference in RPM for the 25mm 12V vs 5V motors.
12. Please see the images below for Part numbers for the USB Charger and cable used in charging the 5V motors.
5V USB Charger 5V USB Cable
PN: MT03-0301-069008 PN: MT03-0301-069007
Related Articles
How to Factory Reset a Motor
Note: A factory reset will remove all remote pairings, and the shade will need to be set up again. How to Factory Reset a Motorized Shade To perform a factory reset on your motorized shade: Press and hold the P1 button for 14 seconds. (The shade will ...5v Li-Ion Motor | Advantages over 12v Li-Ion Motor (1st Gen)
Rollease Acmeda's 5v Zero Li-Ion motors boasts many advantages over that of its predecessor - the 12v Li-ion motor. 5v Zero Li-Ion Highlights Reduced Motor Head thickness (Smaller Light Gaps) compared to the 12v motor offering. Integrated USB ...Motor Programming Guide
How to Pair/Un-Pair Motor From a Remote
Pairing or Un-pairing a motor from a remote is the same process. How to Pair or Un-Pair/Remote a Motor From a Remote Relevant Documentation Automate Li-Ion Programming Instructions Related Products Automate Controllers Automate MotorsHow to check if Motor is ARC or Non-ARC
In this article you will find the way on how to check if you have an ARC or NON-ARC motor, as well as information on the programming guides of these motors. ARC being our new range and NON-ARC are our old, obsoleted motors. First check if the P1 ...